Building custom event experiences with the Customer Insights Journeys Event API, Part I
Introduction to the CIJ Event API, the unofficial developer hub, and a step-by-step guide to get started.

Introduction and Background
If there is one module in Dynamics 365 Customer Insights, Journeys that I personally really enjoy working with, it is the event module. Events are one of those areas where marketing, sales, community building and customer engagement all come together in a very tangible way. It is also one of the easiest examples for explaining the power of customer insights and especially trigger-based communication.
A good event experience is not just about creating an event record and sending out an invitation email. The tricky part is all about helping people discover the right event in the first place, understand what is actually going to happen, register without any issues, manage their session choices if needed, and then receive the right communication before and after the event.
In order to get people to sign up for events, it is important to provide a seamless registration journey, which starts with a clear landing page and a simple, easy-to-understand registration form.
Out of the box, Customer Insights, Journeys already provides several ways to publish events and enable registration, and for many scenarios this is absolutely sufficient and the majority will not need more. You can use a single registration page, either as a standalone hosted form or embedded directly into your website. (Here I can recommend many other community member contributions — see the resources section below.) You can also go for a more complete event registration portal, for example using Power Pages or a custom web app. And then there is the third option, which is building a custom solution using the Event API, which this blog post is all about.
Event API
The Customer Insights team made the API available back in Q3/4 of 2025 with limited resources available to help developers understand its full capabilities. Thankfully, there is a full Swagger API definition available to download, which was the basis for my little project to publish the “unofficial developer hub for the CIJ Event Management API”.
The hub is meant to serve two main purposes. On the one hand, it acts as a kind of documentation layer, giving an overview of the available API calls, the expected structure and the type of data you can retrieve from Customer Insights, Journeys. On the other hand, it works as a playground where you can actually try things out.
Instead of jumping straight into Postman or building a custom application from scratch, you can simply enter your URL and token information and start testing the API with your own event data. (Note: your credentials are not stored by the hub — but as good practice, avoid using a production token while exploring.) The idea is to support both developers and more advanced makers or consultants. For you as a developer, it should reduce the time needed to understand the API and get started. For you as a consultant, solution architect or citizen developer, it makes the API more tangible, even if you are not writing the final implementation yourself.
How to get started
Before you can start building or testing against the Event API, there are a few quick configuration steps to complete inside the Customer Insights, Journeys app itself. The following guide walks you through each of them:
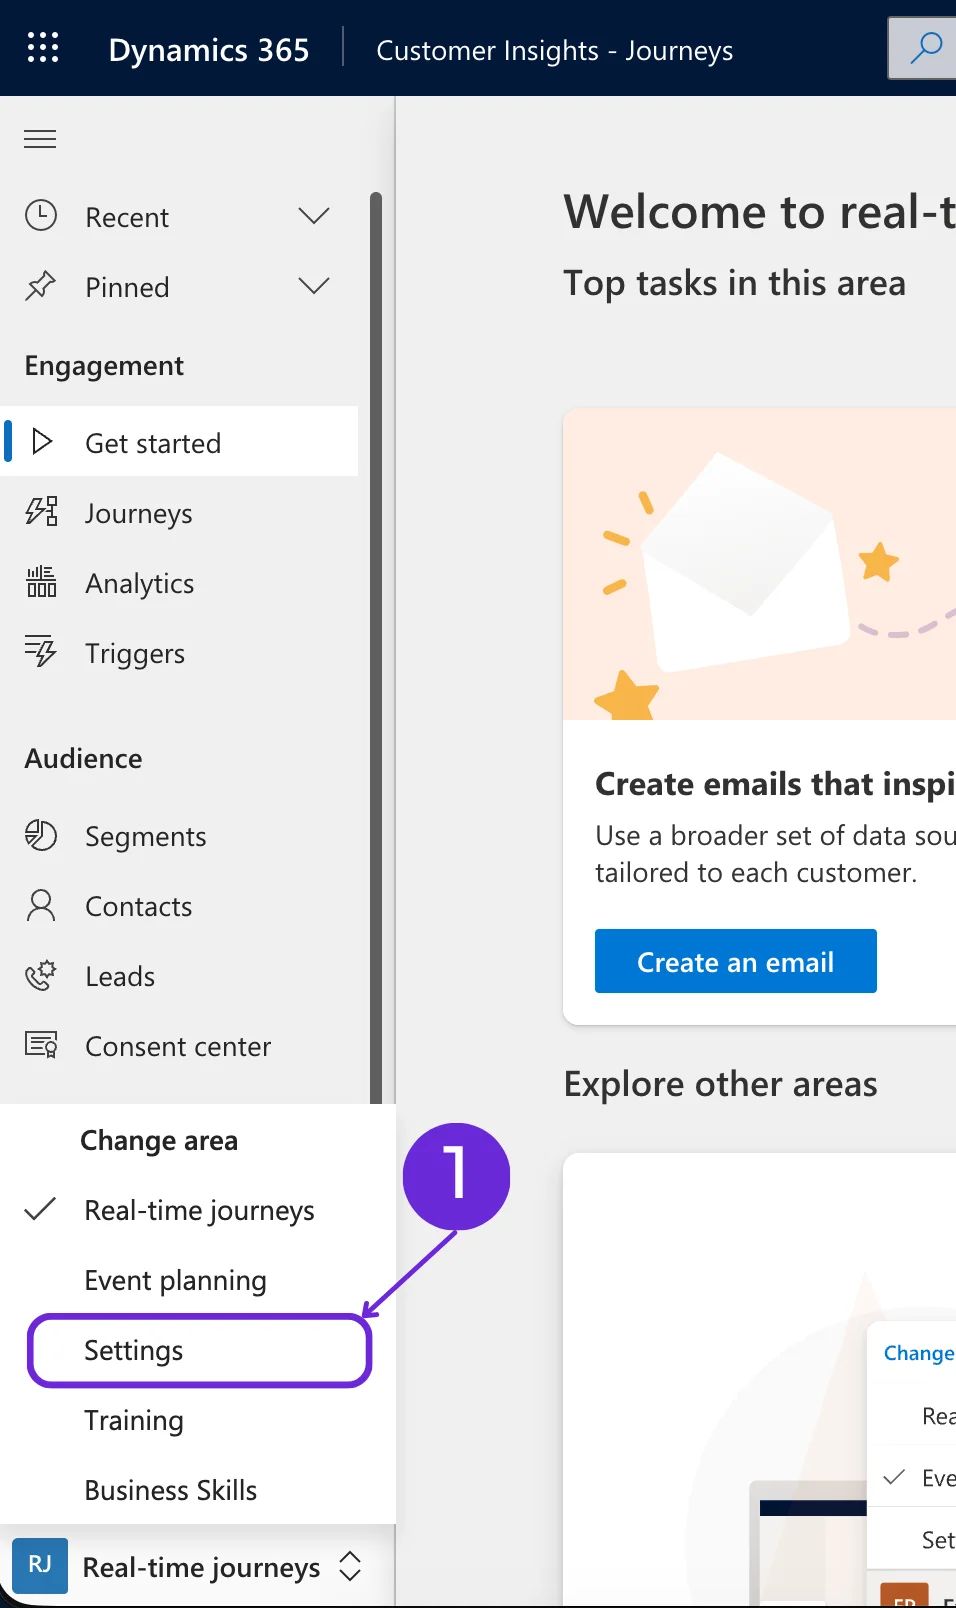
To get started, open the Customer Insights, Journeys app and navigate to the Settings area (callout 1). This is where you will find all the relevant configuration options for event management and API access.
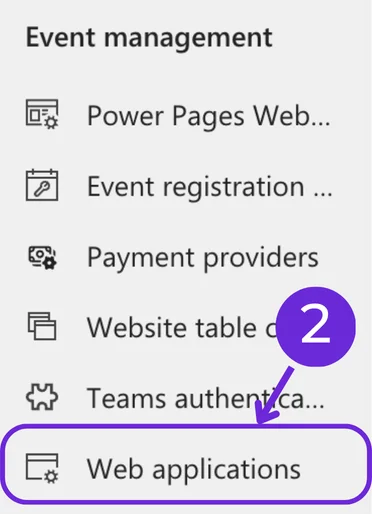
Once you are in the Settings area, open the Event Management group and select Web Applications (callout 2). This is where you register which external applications are allowed to interact with the Event API.
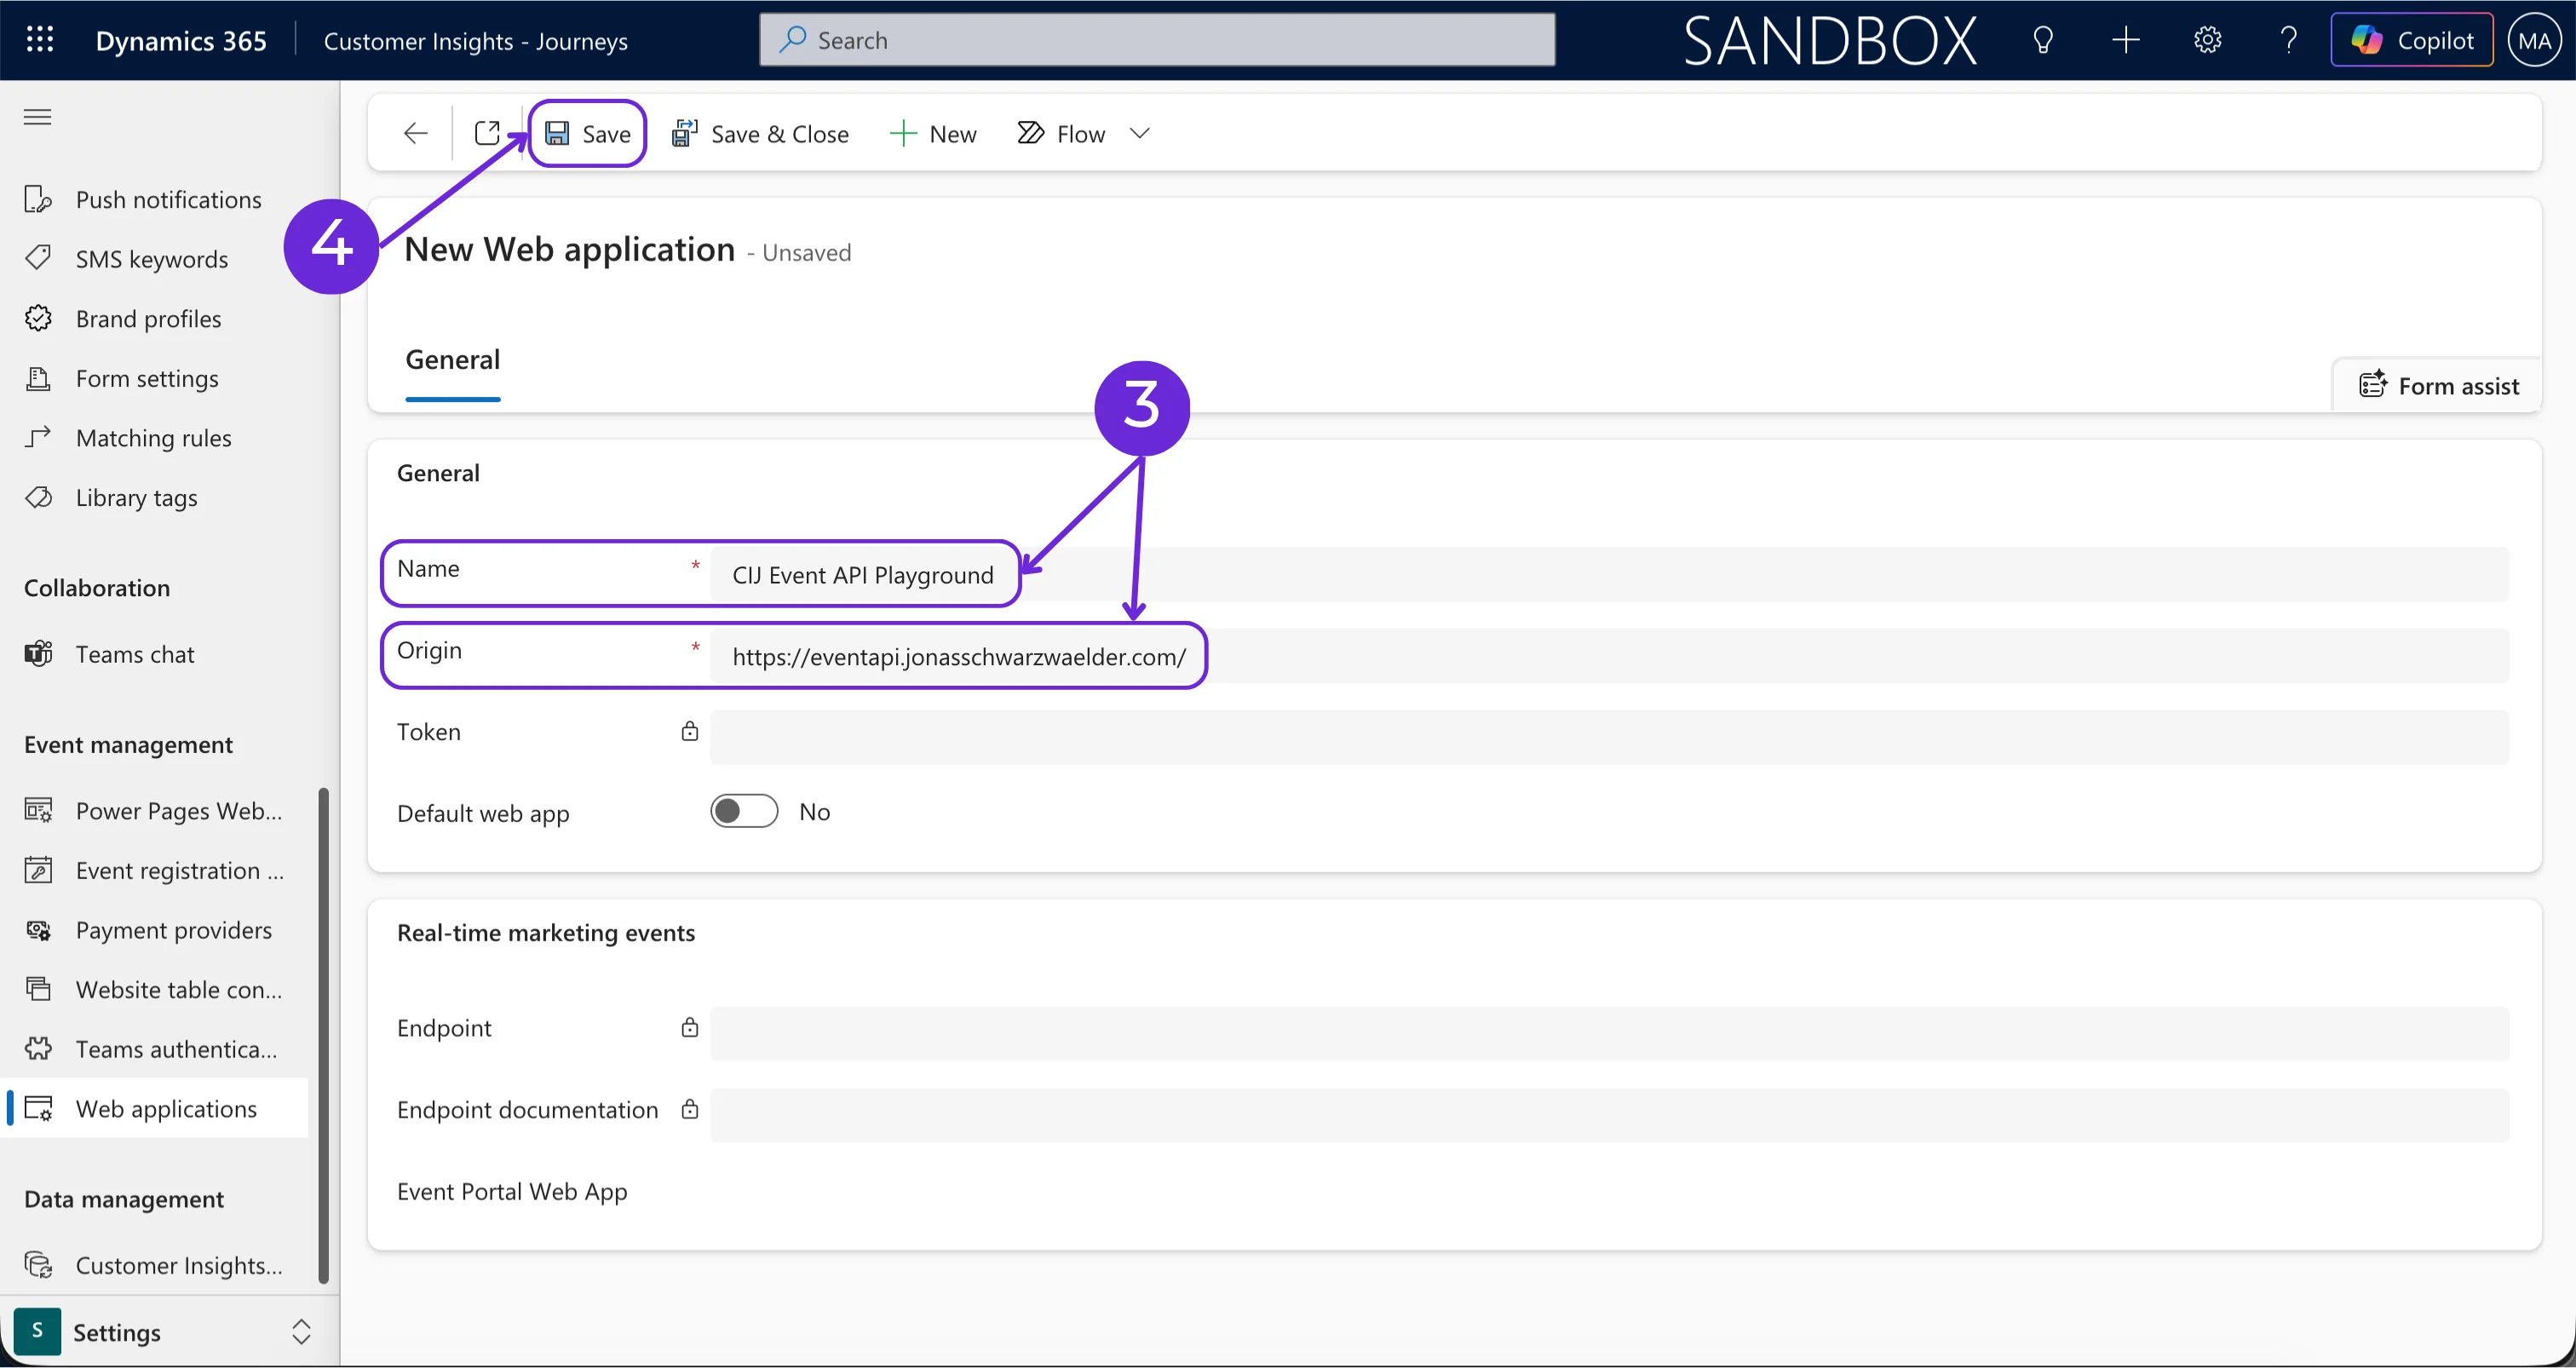
Next, create a new Web Application record. Fill in the two fields below (callout 3) and then click Save (callout 4):
- Name: enter a descriptive name so you can easily identify this integration later
- Origin: enter the URL of the application that will be making the API calls
After saving, the system generates two important values: the Endpoint URL and the Token (callout 5). Copy both and keep them somewhere accessible and safe, as you will need them to authenticate your API calls.
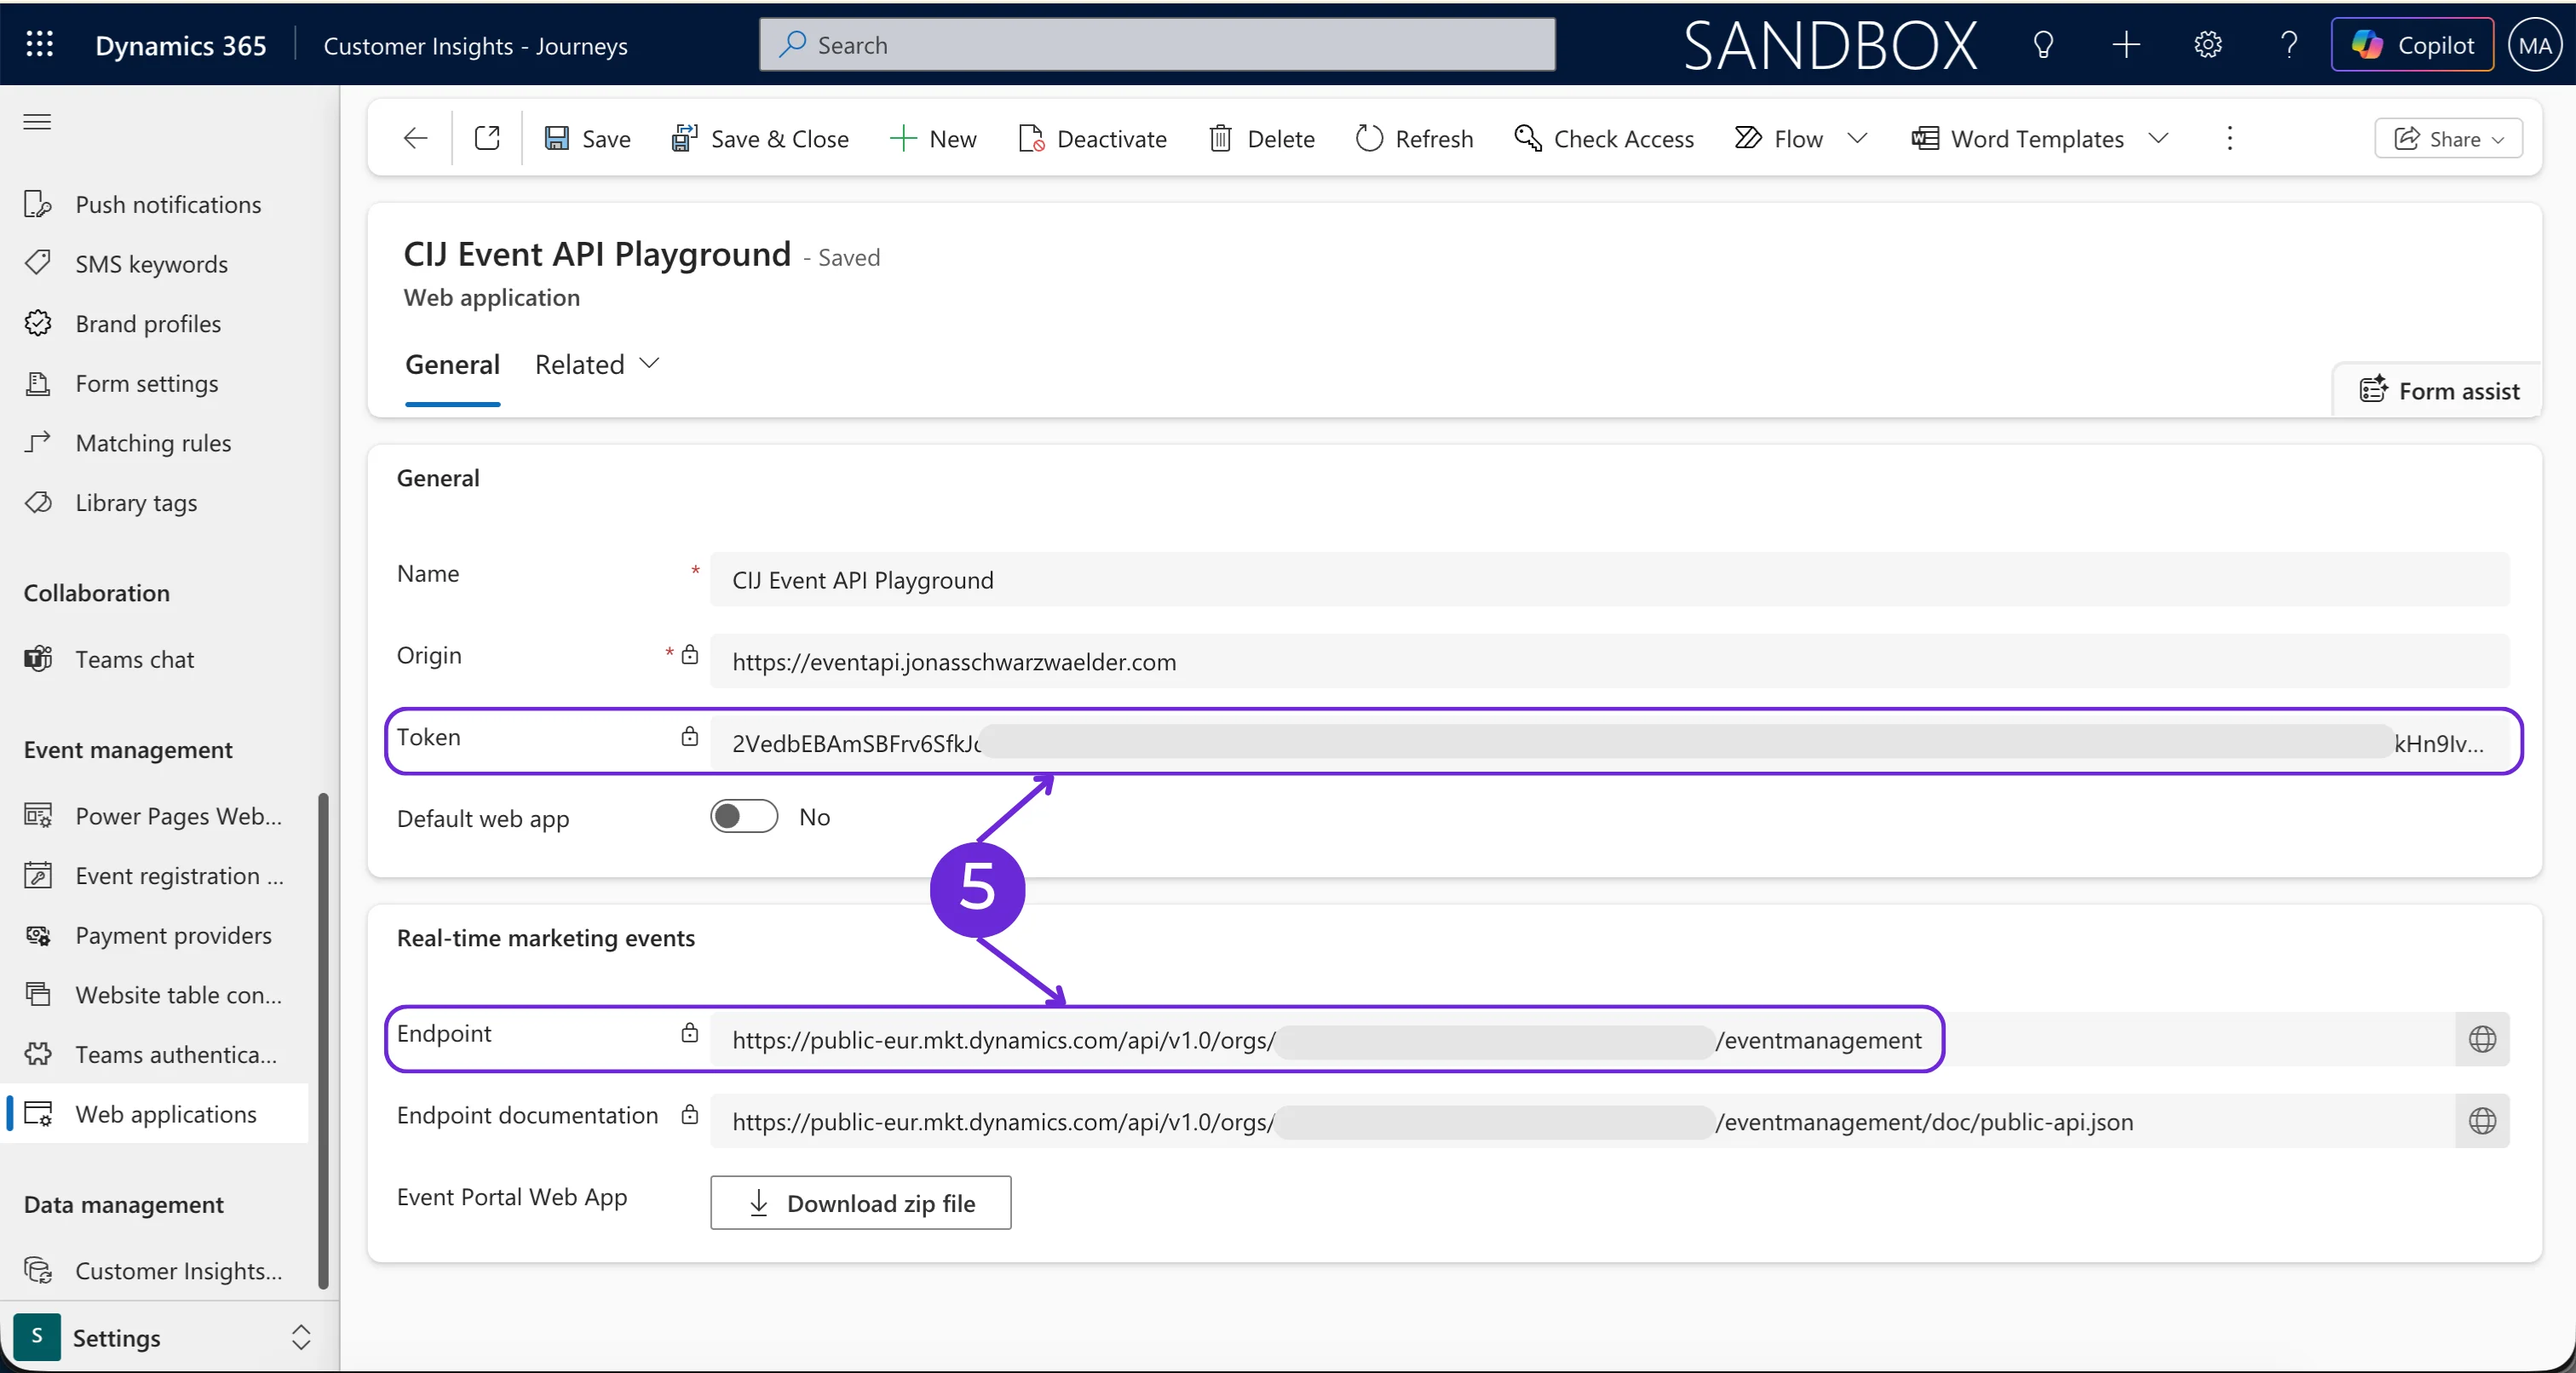
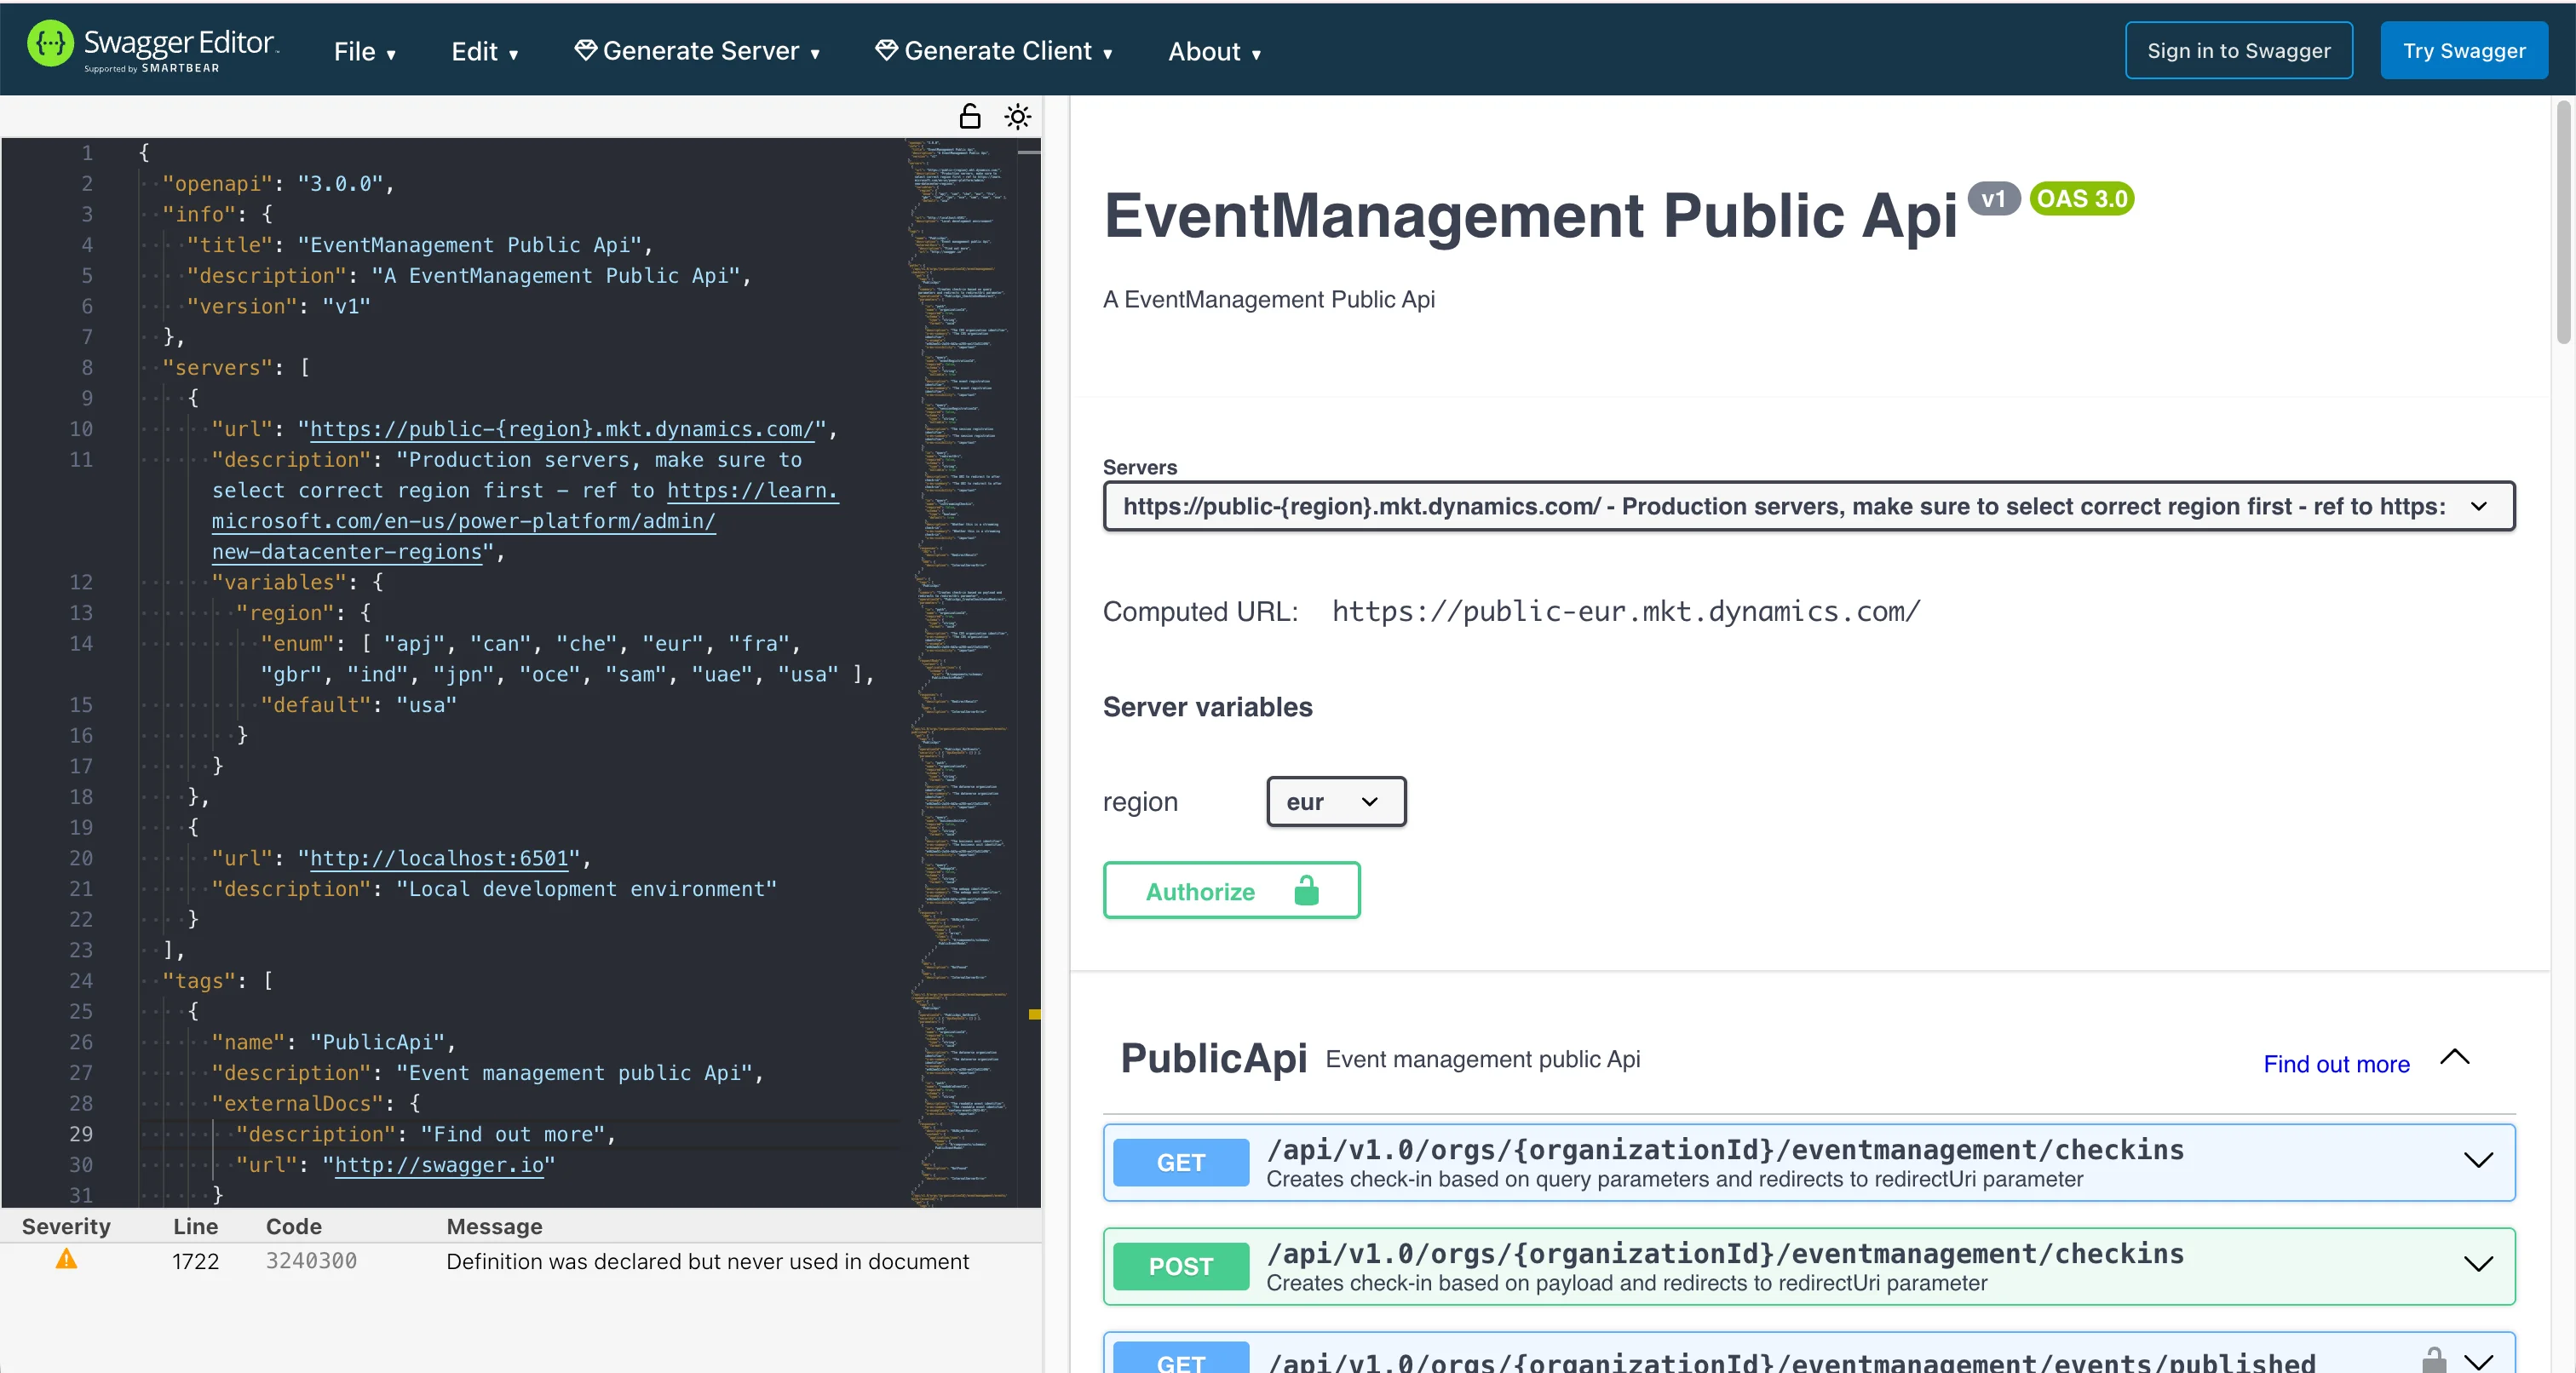
One more useful resource: Below the Endpoint URL is the URL for the public API definition, which you can copy and paste into a Swagger Editor to browse all available endpoints and their full request/response structure.
Event API Playground / Showcase
With those credentials in hand, you are all set. Head over to the CI-J Event API Hub to start exploring. The hub has two main areas: the Playground, where you can test individual API calls against your own data, and the Showcase, which simulates how a real event portal would render that data.
When you first open the Playground, there is an important disclaimer to be aware of:
Your token stays private: the proxy never stores, logs, or shares it, and only forwards requests to
*.mkt.dynamics.com. As good practice, use a non-production token while exploring.
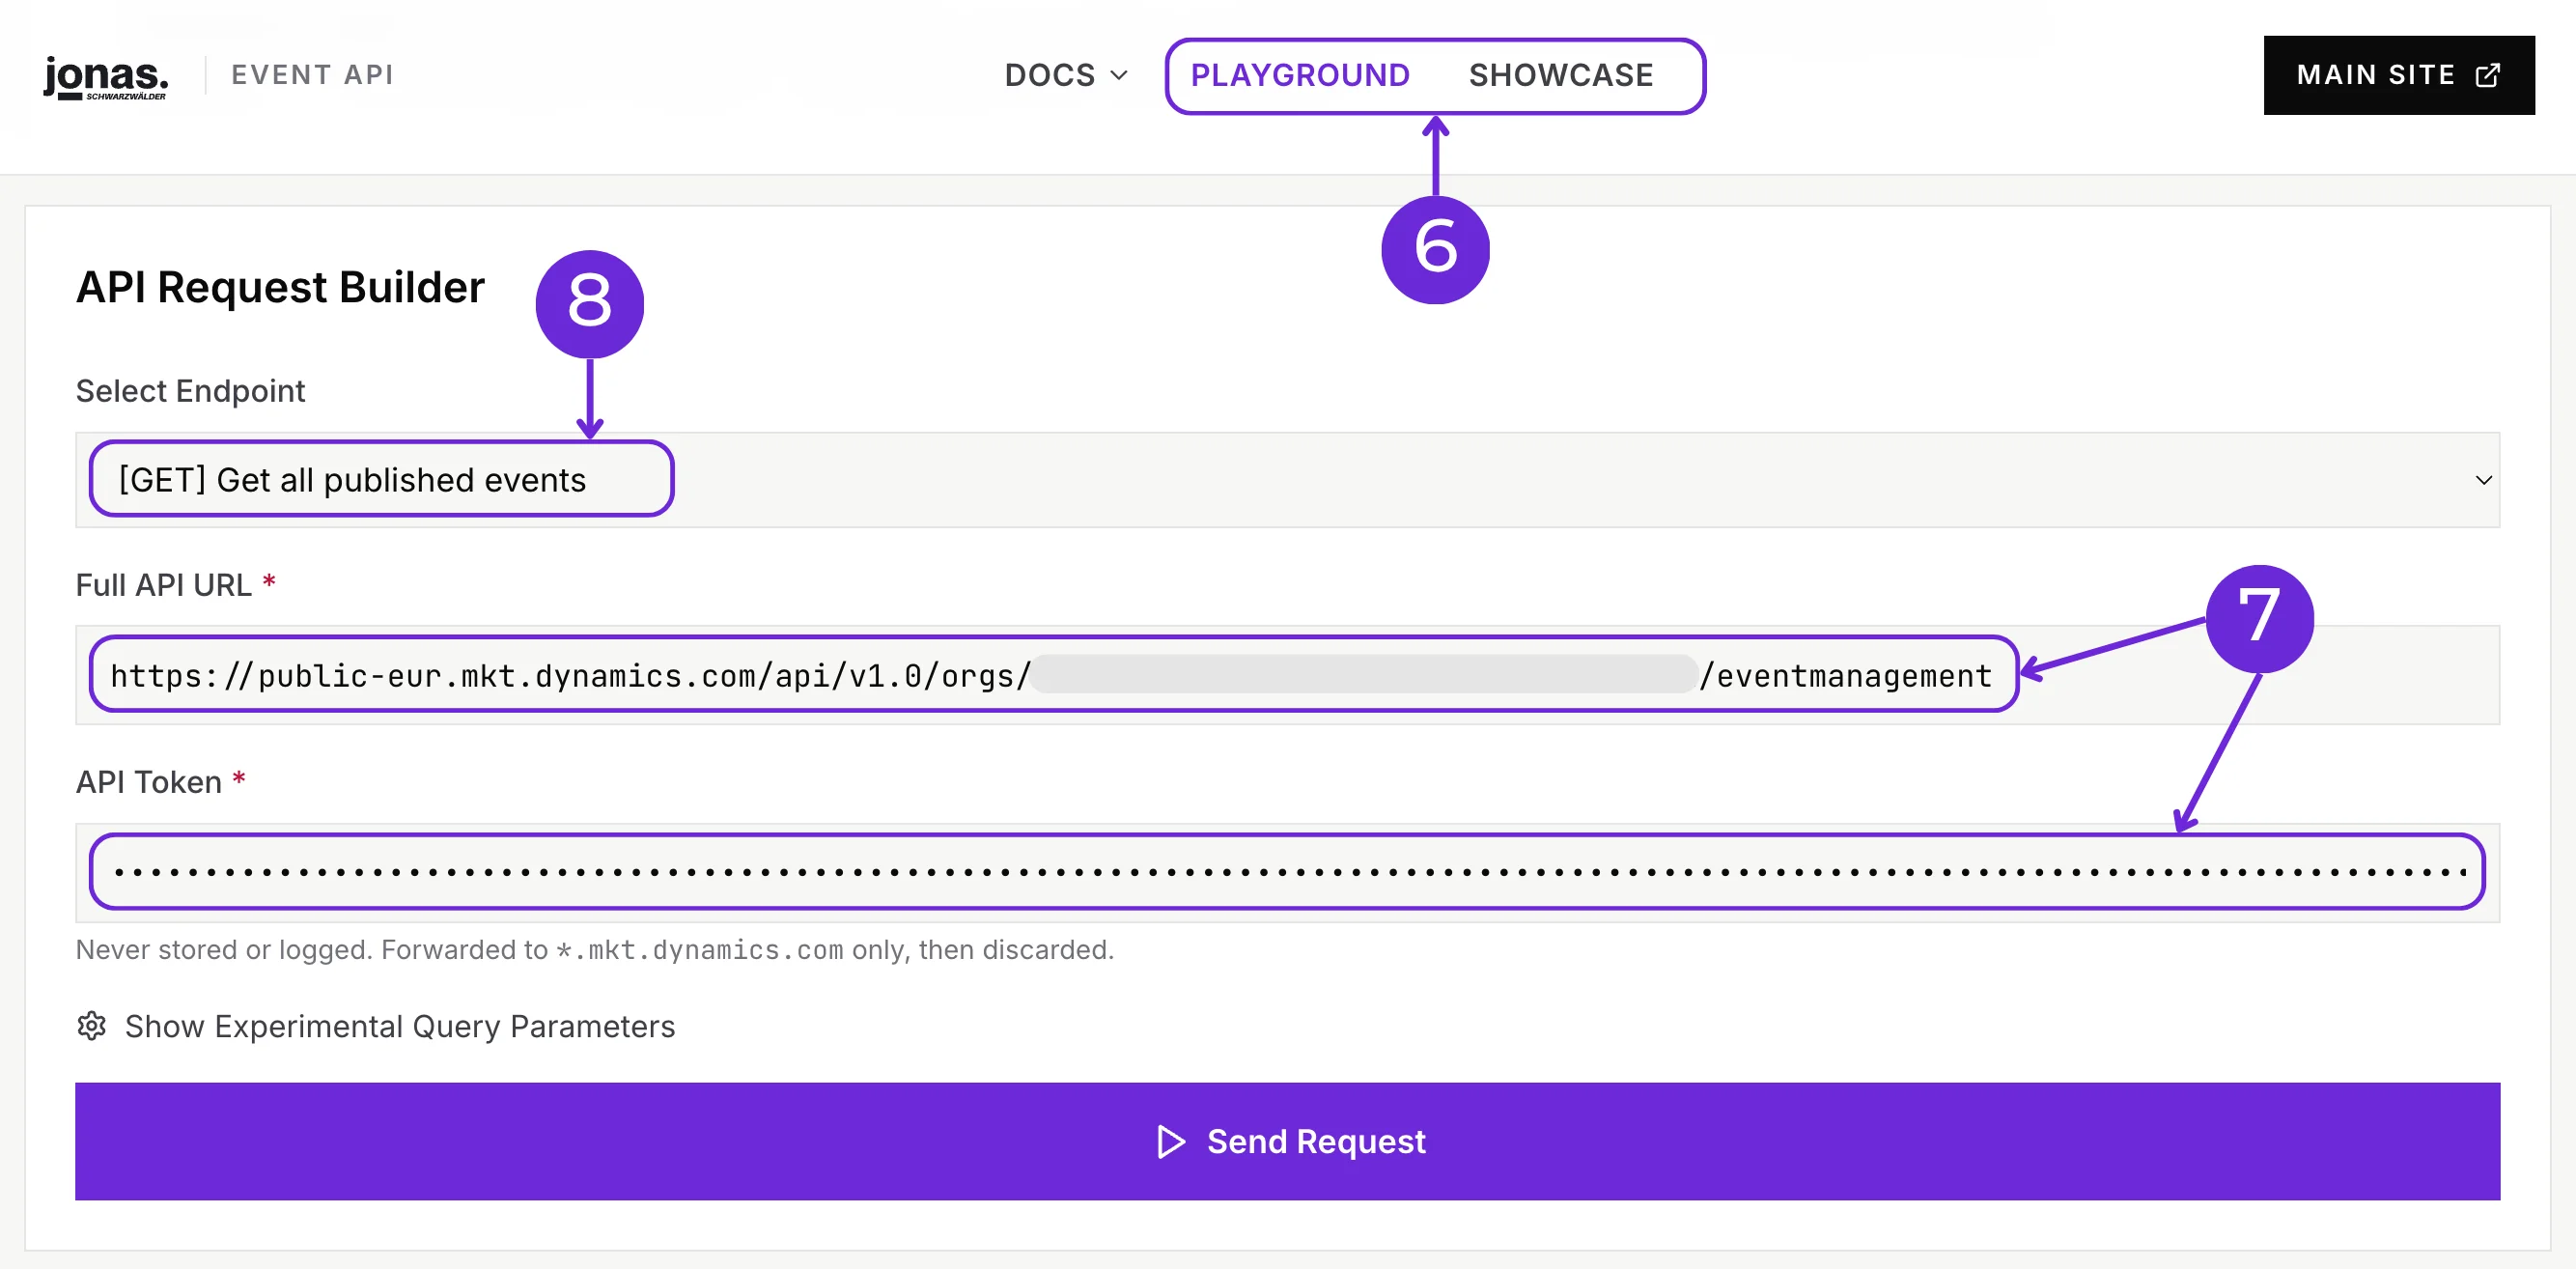
With that in mind, you can start using the Playground. Navigate to the Playground tab in the top navigation (callout 6) and enter the Endpoint URL and Token you copied earlier into the corresponding fields (callout 7). Then open the Select Endpoint dropdown (callout 8) to choose the API call you want to test. The dropdown groups all available endpoints by category, such as Events, Sessions, Speakers, and Registration (callout 9 in the next screenshot). For more details on individual API calls, see the API reference.
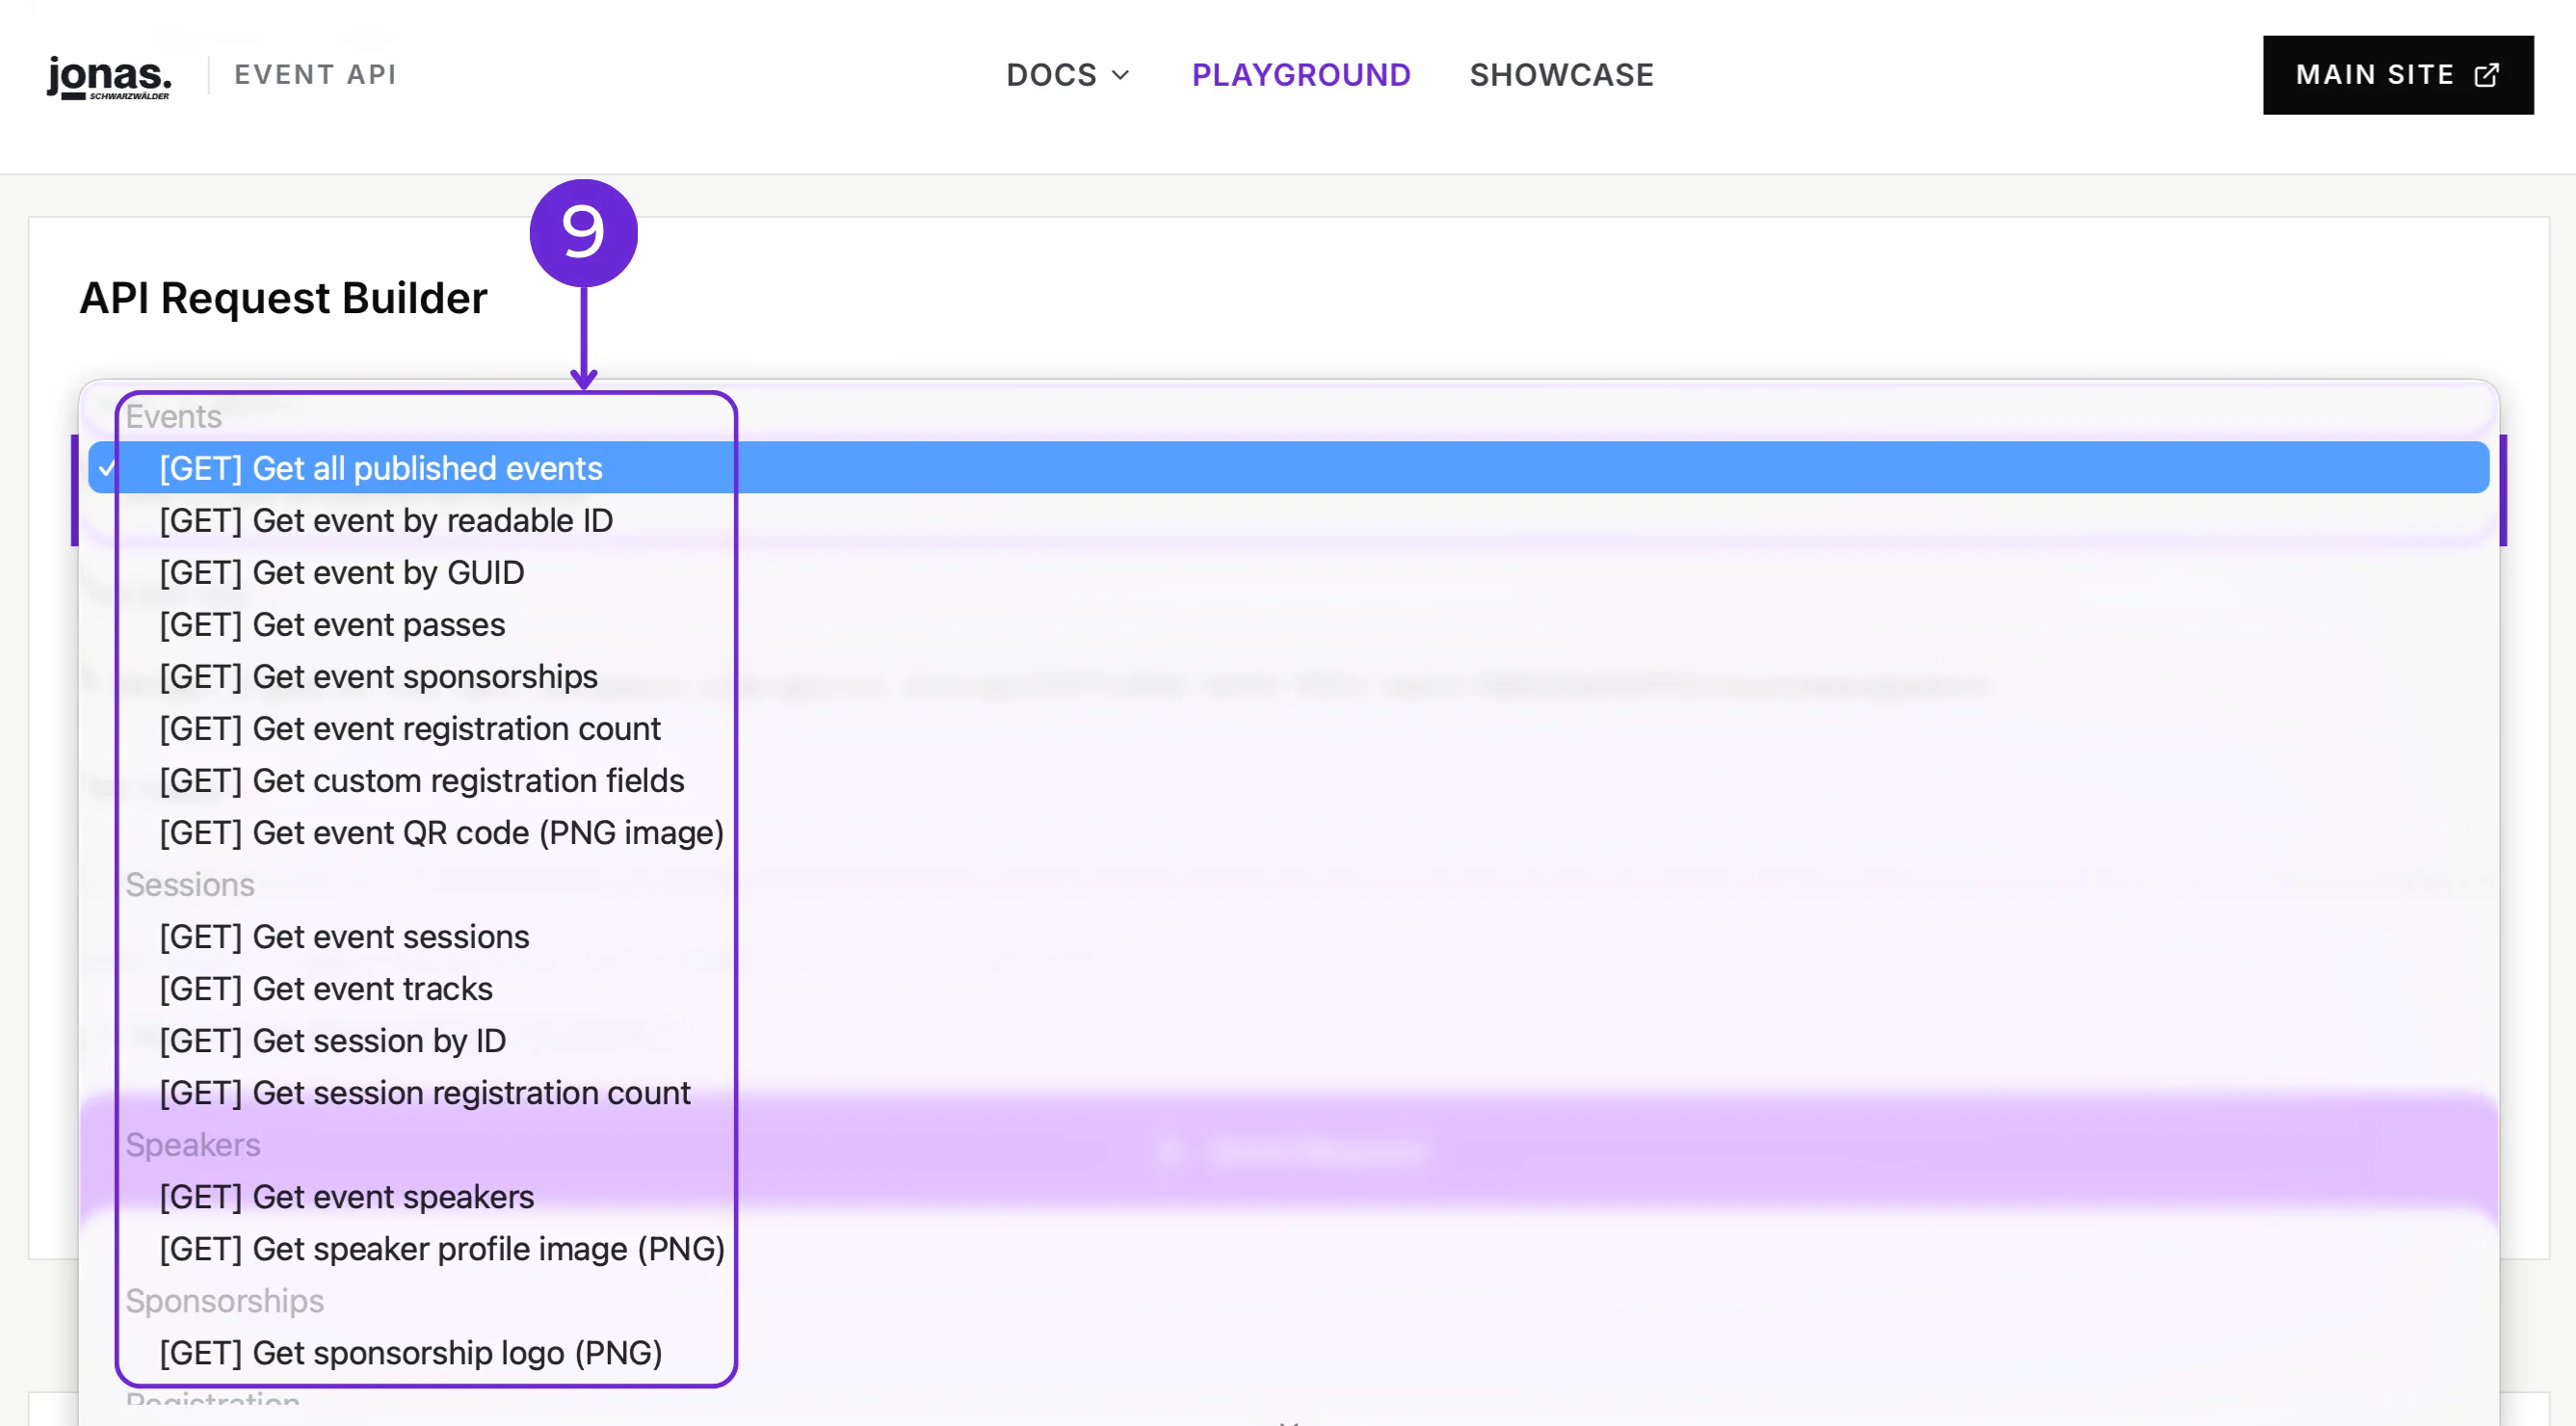
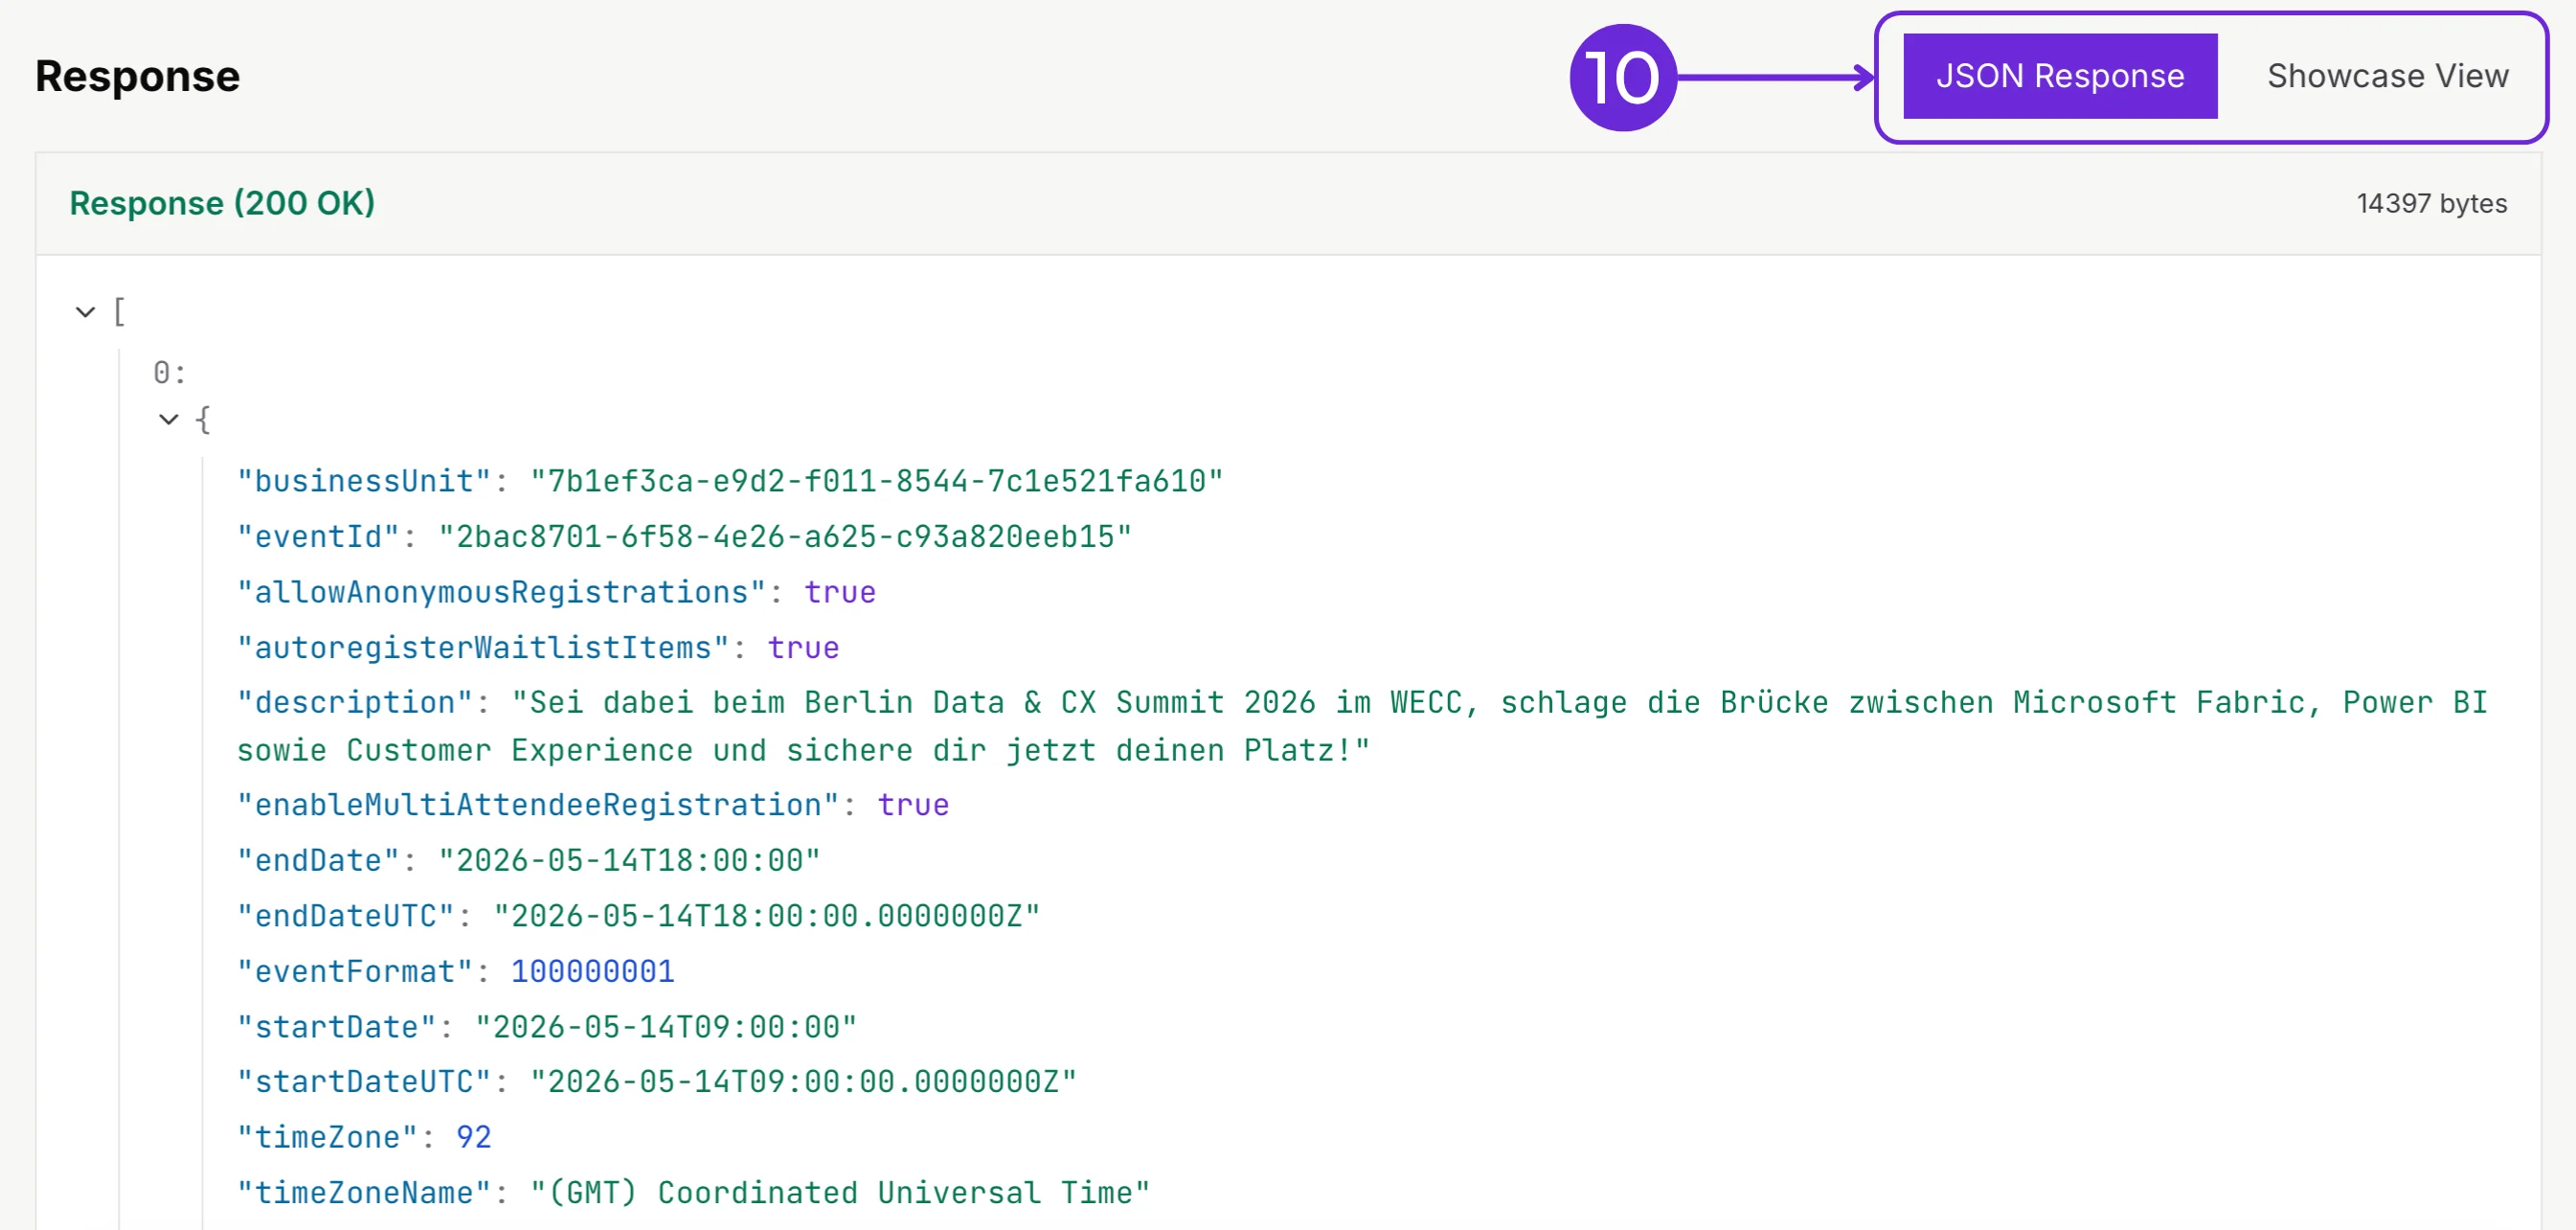
Once you click Send Request, the response appears in the section below. In this example, the selected endpoint is [GET] Get all published events. Depending on the endpoint you choose, you may need to provide different input values first.
The response shows the full JSON data returned by the API. For certain endpoints, you can also toggle to the Showcase View (callout 10), which renders the data as it would appear in a real event portal, giving you a useful preview of the end-user experience.
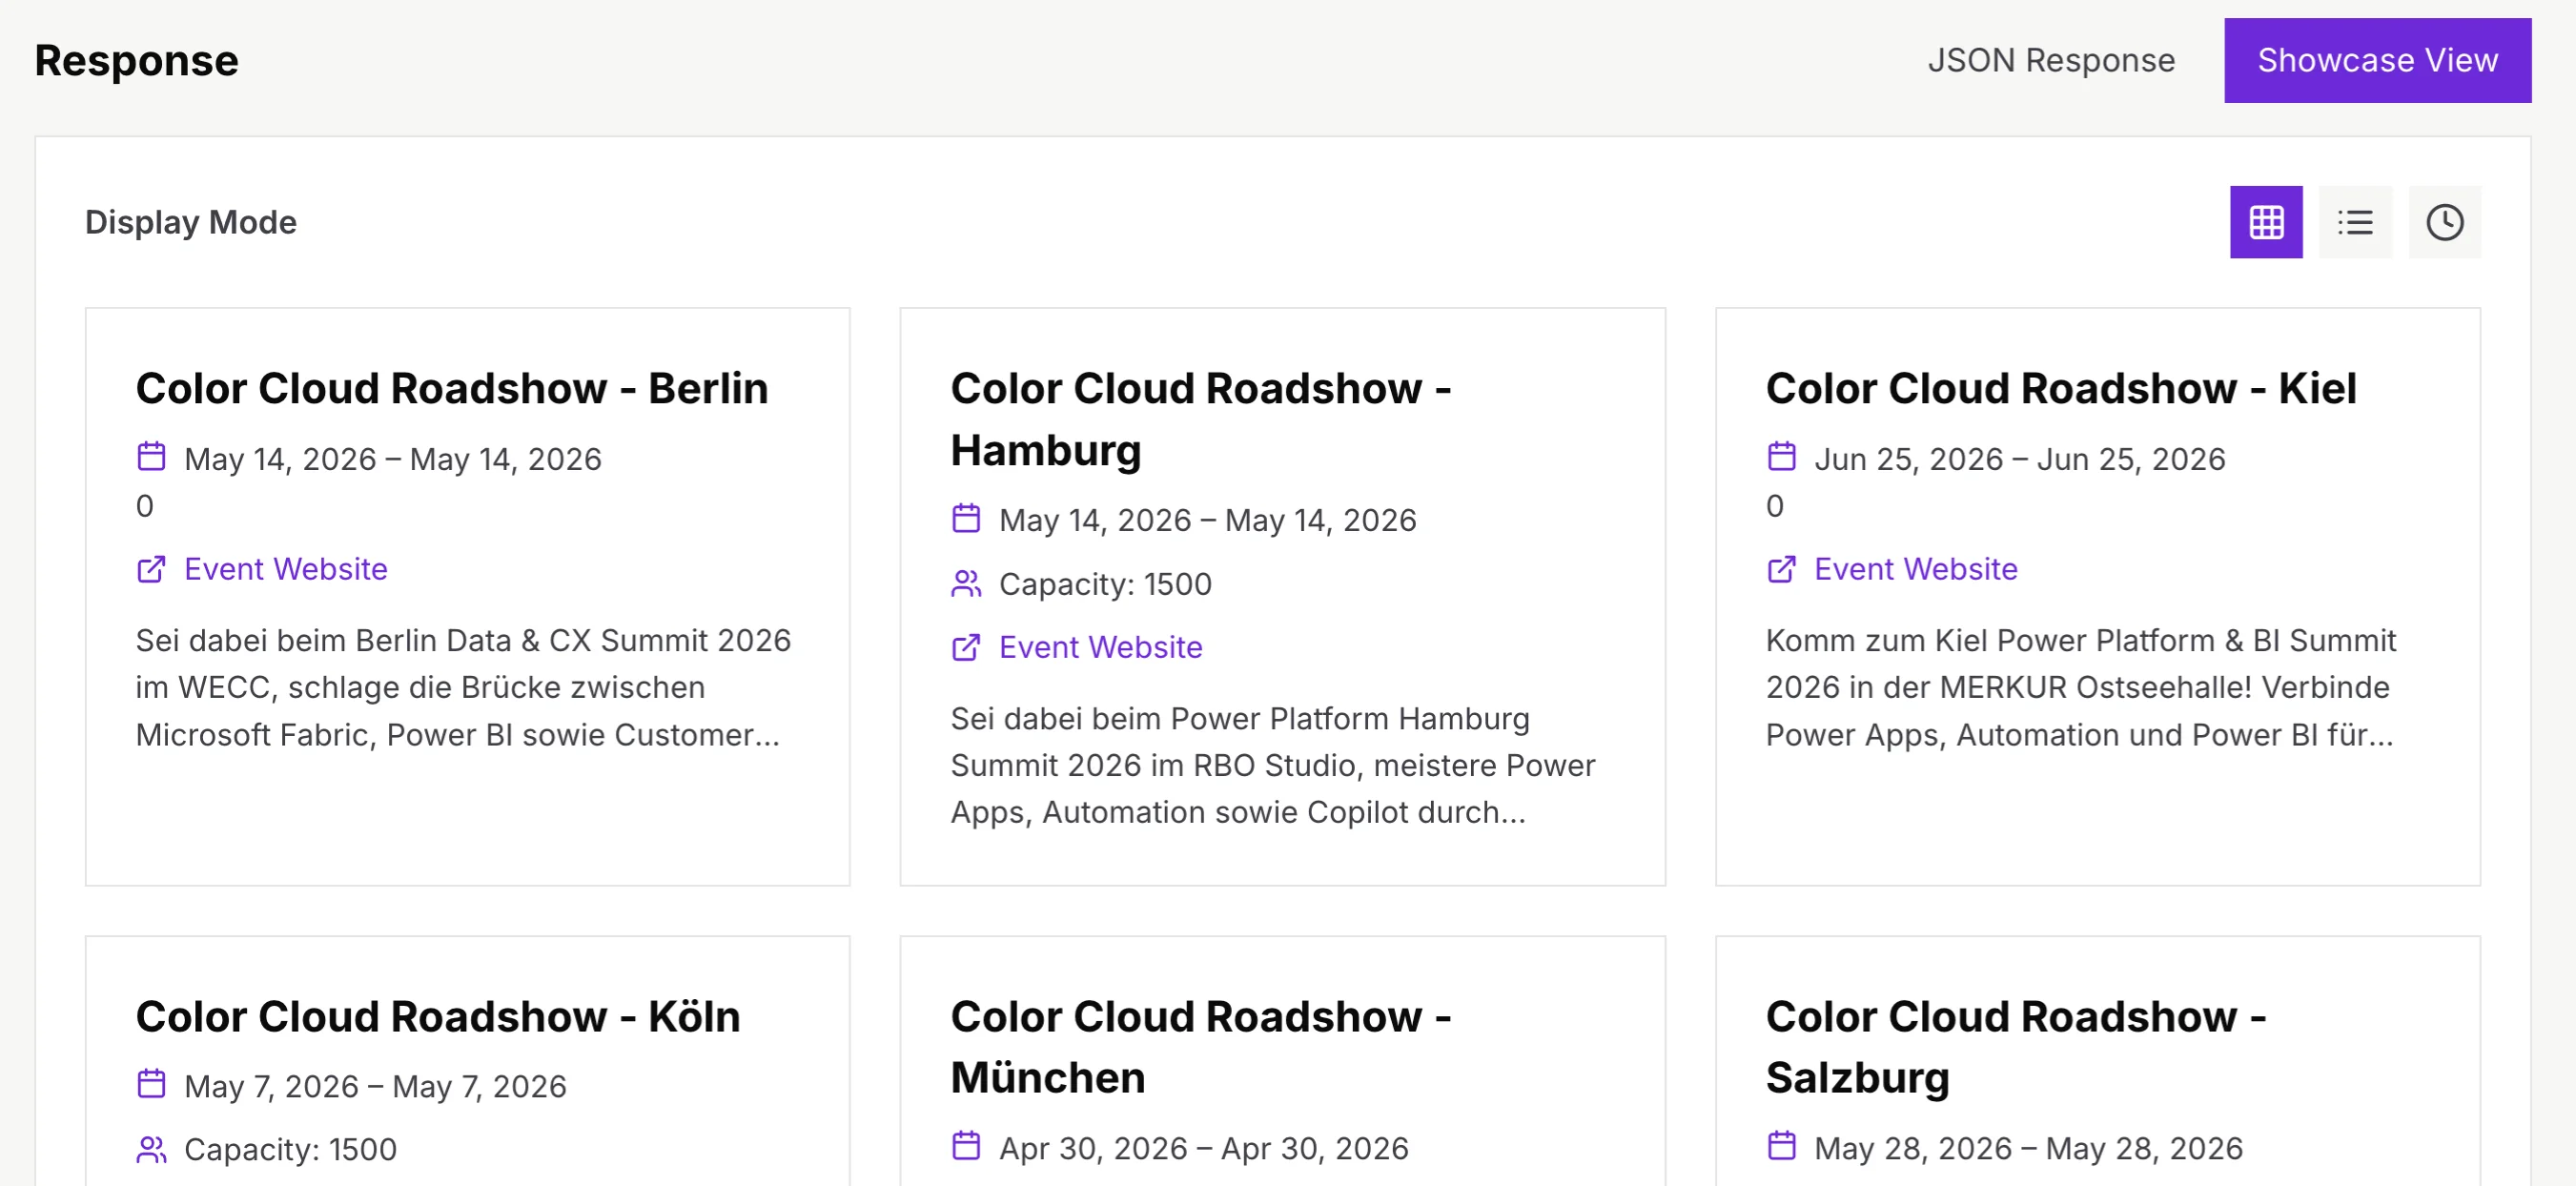
Below the response, the Playground also generates ready-to-use code snippets based on your inputs and the selected API call. The following languages are available (note: the generated logic is AI-assisted and should be reviewed before use):
- cURL
- JavaScript
- Python
- TypeScript
- Power Automate (Instructions)
Outlook / upcoming topics
This is only Part I, and there is quite a bit more to explore. The Event API has a lot of potential for building rich, custom event experiences, and I have a few topics lined up that I think will add real value for anyone looking to go beyond the basics. In the next part(s) I plan to cover:
- Extending the API response with custom fields
- Pros and cons of the Event API versus custom Dataverse requests
- Implementing event registration including matching rules and opt-in setup (OOTB)
If there is a specific topic you would like to see covered, or if you are already building something with the Event API and want to share your experience, I would love to hear about it. And of course, if you spot any bugs or inaccuracies in the hub or in this post, please do let me know. Until then, have fun exploring!